
A Bitty Week
Ok, I got trapped into non-boat activities, primarily Skyrim with a bow-wielding cat. But some model boat stuff happened, so I’ll do this post to catch you up on the things that did.
I did redo the profiles of the superstructure and came up with this:-
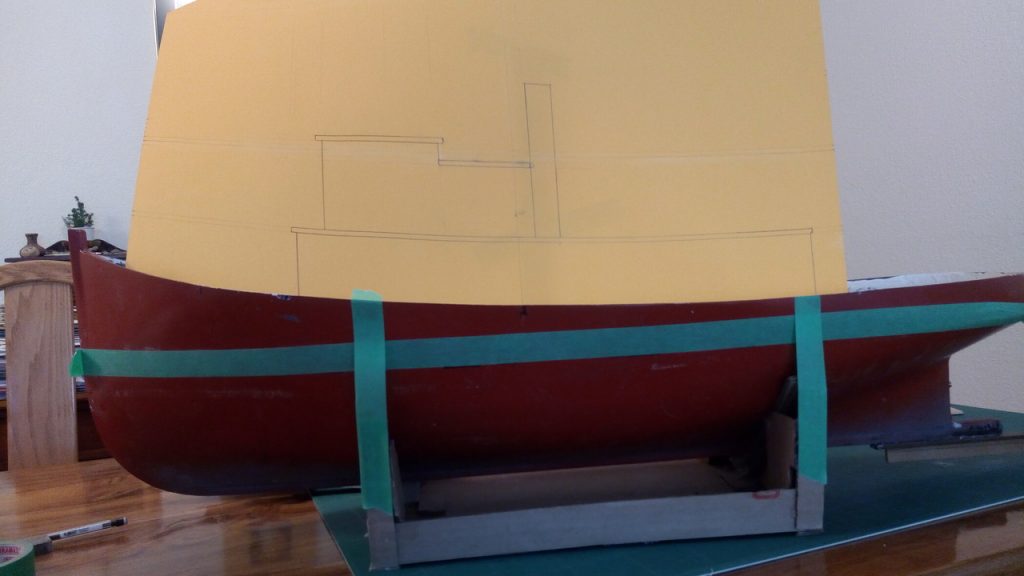
Which I am happy about. If you use a sheet of paper to mask off the hull below the bottom of the green tape, the waterline, everything looks to be in decent proportion to me. So I can go ahead and look at windows and doors and ports and railings for the superstructure and then figure out how I am going to make them. Nagging at me in this next stage is this photo of the Master’s wheelhouse.

Look closely at the open window just ahead of the open wheelhouse door. I swear that’s a curved sash. The vertical panes of glass may each be flat, but the actual frame is curved to match the wheelhouse wall. That’s nice work in a fixed window, but to do it in a sliding sash, well that’s special. I guess the proper nautical term is the front starboard quarter light, I’m going to have to e-mail the Master Society to see if I can confirm that that is so. If it is, can I possibly model it?
I’ve just taken another look on the website, and found this picture of the wheelhouse interior.

You’re looking at the Wheel, the engine Telegraph, the Binnacle, and the lid of the Voicebox. On the extreme right, above the holder for the bag, there’s a light coloured something that I think looks like a doorstop wedge, with the wedge pointing downward. And the wall thickness below the windowsill is more than enough for the window frame to drop inside. And poring through the other interior pictures on the Master Website, I can see similar wedges at the bottom of other windows.
I think that this was the standard, the lights do slide down, not as counter-weighted sashes, but to be wedged in position as wanted. This is exciting woodwork, but on the model there’s no chance of getting fingers inside the wheelhouse to manipulate the wedge. Hmmm!
Anyhow, the motor and belt drive that I ordered from Banggood arrived, along with a handheld optical tachometer. And this gave me a chance to do a little testing.
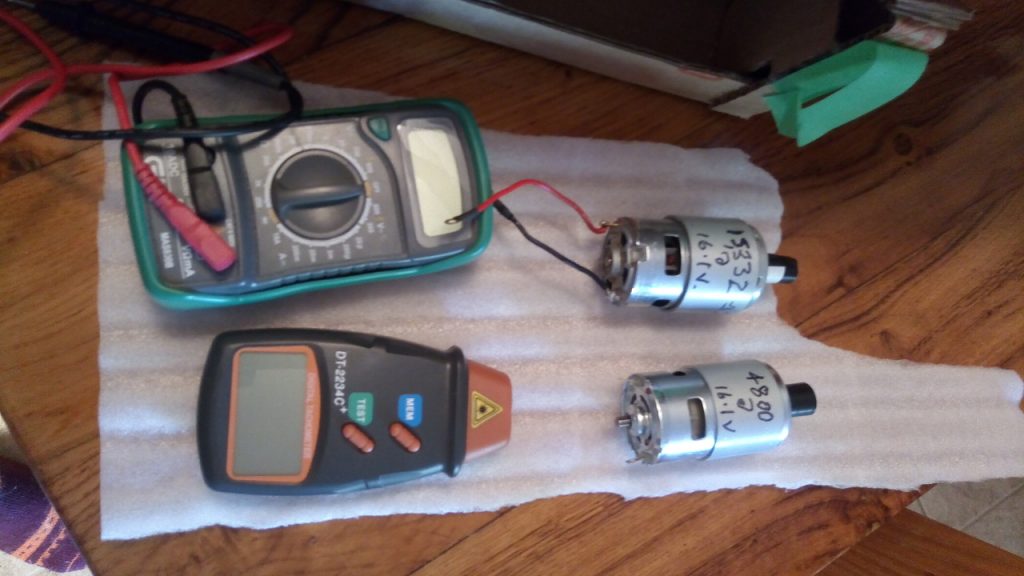
My old multimeter is on the left, above the new tachometer. The tachometer works by reflection of a small laser from a little piece of tape on the motor shaft. The motor with the two leads attached is one I dismantled from a cordless drill. It ran at 15,332 rpm attached to my 12 volt battery charger, which was actually putting out 16.1 volts. The current was close to 2 amps. The motor below is the new one, producing just 4800 rpm at the same voltage, but with the current down to 0.3 amps.
On the strength of this, I ordered another prop, a 70 mm Four Blade from Harbor Models. I think that the three to one reduction of the belt drive to this prop will be a little too much, probably I will do better with a two to one. But I will make the motor mount adjustable, and bathtub testing will provide an answer. I am really confident that the torque is going to be lots!

The actual model building work that has got done was the cut-out of the hatch area in the deck and then the installation of the deck in the model. Here it is all glued up and with the deck beams removed. The cut-out was excessively interesting, done with the Swedish Mora knife showing to the left. This because I don’t have access to a scroll saw. So I used the woodcarvers technique of a vertical stop cut part way through, then a vee cut in towards the stop cut to get enough waste out of the way to make the stop cut deeper. It took around 2 1/2 hours for the hole to appear.
I glued the deck to the hull side with thickened epoxy pushed into the upper side corner. It seems secure but now it’s dry I am going to push another epoxy filet into the underside. Negligible weight but feelings of security.
An awful lot of the fun of modelling for me is the process of discovery. It makes me look closer at things and get curious and find out more. Today this even happened as I was writing this, with the look at the interior pictures of the Master. I may not get a lot done, but it keeps me out of mischief!
Very interesting detail about the window light which is a flat pane in a curved frame. At this scale that will not I fear be easy to get right. However with your skin lol level it should be possible.
That should be skill not the gibberish that spell check produced.